Can You Transport a Freezer on Its Side [Chest, Upright, or Fridge Combo]
I just had to replace my refrigerator and, when the time came to bring the new one home, we realized it was too tall to ride upright in the truck. If like me, you’ve had to ask yourself if you can transport a fridge on its side, I’ve got the answer.
Manufacturers recommend against transporting a freezer on its side. Still, you can minimize the risk of permanent damage by laying it compressor-side down, only leaving it on its side for as long as necessary, and allowing it to stand unplugged for as long as it was on its side before plugging it in. Improper transport may damage the compressor.
Keep reading to find out all about the potential risks of transporting a freezer on its side, even if you are only moving the freezer a short distance, plus helpful breakdowns of the best way to transport refrigerator-freezer combos, upright freezers, chest freezers, and minifridges.
Is it okay to transport a freezer on its side?
Freezers and refrigerators are items in your home that you may go your entire life without moving – at least not farther than it takes to clean underneath them. When the time comes to transport your appliance, chances are the question of whether or not you can lay the freezer on its side comes up pretty quickly.
Manufacturers recommend against transporting a freezer on its side because of the potential for damaging the compressor, but there are certain precautions you can take to minimize the risk:
- Lay the freezer compressor-side down – Since a major part of the potential risk is starting the compressor while the refrigerant has drained out of it, laying the freezer down on the side of the compressor drastically reduces this likelihood.
- Leave the freezer on its side only as long as necessary – Keep the freezer upright for as long as reasonable then stand it back up as possible. That means don’t store the freezer on its side, and don’t try to get ahead by loading the truck the night before.
- Allow the freezer to sit upright for as long as it was on its side before plugging it back in. Let the freezer stand up to 24 hours before starting to allow the refrigerant to redistribute.
Let’s take a more thorough look at what exactly happens to the freezer when it’s transported on its side, then I’ll go into the best ways to transport several kinds of freezers, including the kitchen standard refrigerator-freezer combo.
What happens if you lay a fridge or freezer on its side to move it?
Let’s face it: sometimes there’s no way to avoid going against the manufacturer’s recommendations. For example, most manufacturers recommend that you not lay your freezer on its side, but sometimes it’s necessary. We’ve discussed the best ways to minimize the risk of damaging your freezer, but let’s talk about the potential risks.
When you move a freezer on its side, the refrigerant will pool in parts of the system it typically doesn’t; if you restart the compressor before the refrigerant has been properly redistributed, it will overheat and potentially destroy the compressor. There is also a greater risk of damaging the compressor or disconnecting tubes when the freezer is rotated.
The compressor is basically what makes your freezer work, so it’s important that you do everything possible to avoid damaging it.
What is the compressor side of a freezer?
While there are several types of compressors that may be used in commercial freezers and refrigerators, they all function in the same basic way: the compressor motor pumps the refrigerant through, putting pressure onto the gas, causing it to become compressed and heat up.
As it goes through the system, the hot liquid will pass over the coils, causing it cool, and is eventually converted into a very cold mist that drops the temperature of the freezer.
Speaking of compressors, what happens when you run your AC compressor without oil?
If the compressor is started without refrigerant in it, there won’t be anything to remove the heat from the motor and it will overheat, which can destroy the compressor.
Additionally, if any of the tubes or other elements of the cooling system are damaged, it won’t be able to complete the cycle as intended. The freezer may start initially, but you’re likely to have leaks, loss of pressure, and eventual overheating.
Any of these problems will be expensive fixes, and you definitely don’t want to be dealing with that when you buy a brand-new freezer! So let’s take a look at the best ways to transport some of the most common kinds of freezers.
Can you transport a refrigerator-freezer combo on its side?
The refrigerator-freezer combo appliance is incredibly common and chances are overwhelmingly good you have at least one in your home. When it comes time to transport it, can you lay a refrigerator on its side?
Most manufacturers recommend transporting a refrigerator upright. If it’s necessary to move it on its side, lay it down so that the compressor for the freezer portion is down.
Keeping the refrigerant from draining out of the compressor will reduce the likelihood of damage when you restart the refrigerator.
Now let’s take a look at the proper way to transport a refrigerator.
How to transport a refrigerator-freezer
While it may not be a common occurrence when it comes time to move your refrigerator, it’s important to know the best way to move it without causing any damage.
To transport a refrigerator-freezer combo:
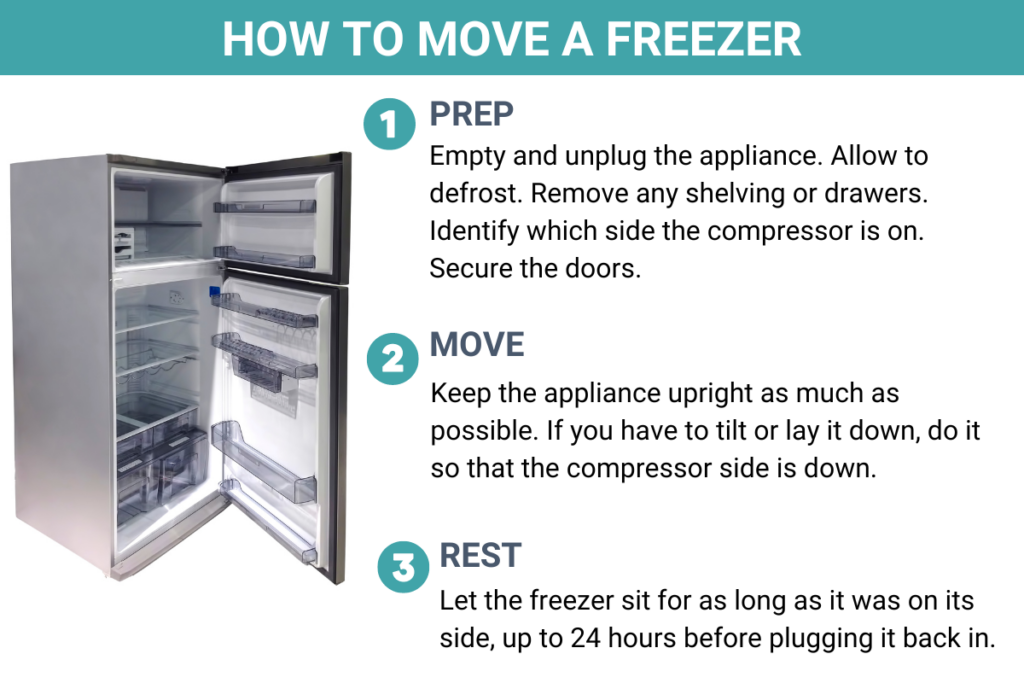
- Empty and unplug the appliance. Allow the freezer to defrost, if necessary.
- Remove any shelves or drawers. While it may be a tedious extra step, this is especially important if you’ll be laying the refrigerator on its side. Once it’s rotated, any pieces that are resting on their supports rather than clicked in will fall out and be damaged or cause damage.
- Protect your floor by laying down a mat, spare flooring, or furniture slider pads.
- Identify the compressor. This will be important while you’re moving the refrigerator, but now’s the time to take note. Pull the refrigerator away from the wall enough that you can step behind it. At the bottom of the refrigerator, you’ll see some vents – the compressor will be on the opposite side.
- Secure the doors. This can be done either by completely wrapping the appliance in moving blankets or using painter’s tape to hold them closed.
- Move the refrigerator. Ideally, you will be able to transport the appliance upright, but you’ll certainly need to lay it down at some point in transit. Never lay the refrigerator on its back. If you need to lean the refrigerator over, ensure that the compressor side is the one that leans downward.
- Let the refrigerator rest. The refrigerator should be allowed to stand upright unplugged for as long as the refrigerator was on its side, up to 24 hours.
How long can a freezer lay on its side before you have to put it back up again? And, how long should you wait before you use it?
Once the refrigerator is plugged back in, it’ll take time for it to return to the proper temperature, although the exact amount of time will depend on the size of the appliance. GE recommends filling the refrigerator about ¾ full and limiting door openings within the first 24-hour period.
I’d recommend waiting to put anything into the refrigerator until you’ve established that it’s cooling at all.
Can you transport a chest freezer on its side?
In addition to the standard refrigerator-freezer combo, many people also have an additional freezer in their homes. A chest freezer – or deep freeze – is perfect for keeping large amounts of meat, fruits, or vegetables in storage for an extended period of time.
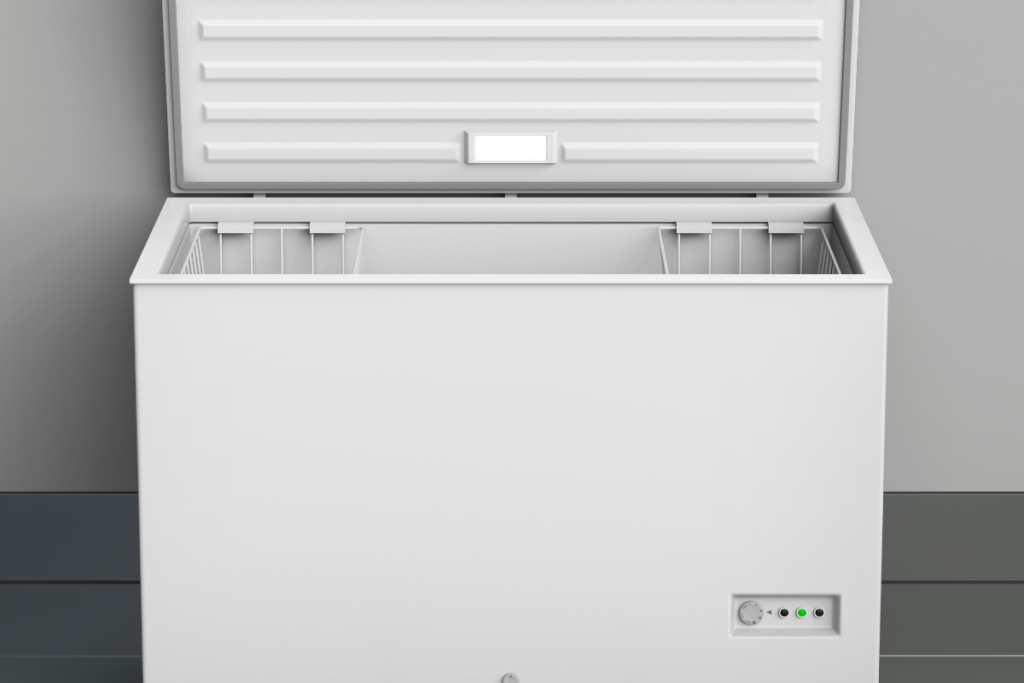
While its general shape may make it less likely to need to be transported on its side than its upright counterpart, is it possible?
As with all other freezer types, chest freezers should only be transported on their side if absolutely necessary. To do so, ensure that the freezer is laid on its compressor side (never its back), and is rotated upright as soon as possible.
After the chest freezer is placed in its final destination, allow it to sit for as long as it was on its side, up to 24 hours.
How to transport a chest freezer
Unlike a kitchen refrigerator, you’ll want to take your chest freezer with you if you ever move to a different house. If you’re hiring movers, they’ll already be well-versed in how to transport a chest freezer, but what if you’re DIYing the move?
To transport a chest freezer:
- Empty and unplug the appliance. Allow the freezer to defrost, if necessary.
- Protect your floor by laying down a mat, spare flooring, or furniture slider pads.
- Identify the compressor. This will be important while you’re moving the freezer, but now’s the time to take note. Pull the freezer away from the wall enough that you can step behind it. At the bottom of the freezer, you’ll see some vents – the compressor will be on the opposite side.
- Secure the lid. Many chest freezers have a lock to keep children from climbing in and getting trapped. If yours doesn’t have a lock, use painter’s tape in several places across the top to keep it from coming open inadvertently.
- Move the freezer. If possible, keep the chest freezer oriented upwards and avoid tipping it more than 45 degrees. If you have to rotate the freezer onto its side, make sure the compressor side you identified earlier is down.
- Let the freezer rest. The chest freezer should be allowed to stand upright unplugged for as long as the unit was on its side, up to 24 hours.
Once the freezer is plugged back in, it’ll take time for it to return to the proper temperature, although the exact amount of time will depend on the size of the appliance, you’re looking at 4-5 hours.
Because you don’t want to risk thawing and refreezing your frozen items, don’t refill the freezer until it’s at least 10°F.
Can you transport an upright freezer on its side?
Many homes in the U.S. have a refrigerator-freezer combo in the kitchen and a secondary freezer in the basement or garage to allow for long-term storage. Unlike the kitchen appliance, the freezer isn’t considered to be part of the home during a move or sale. When it’s time to transport your upright freezer, can you lay it on its side?
Manufacturers discourage consumers from transporting an upright freezer on its side. If it’s necessary, limit the time the freezer must spend on its side, ensure that it is laid on the compressor side only, and allow it to sit upright and unplugged at least as long as it was on its side.

Just like with a combo unit, keeping the refrigerant from draining out of the compressor will reduce the likelihood of damage when you restart the freezer
Now let’s take a look at the proper way to transport an upright freezer.
How to transport an upright freezer
The upright freezer has many of the benefits of a refrigerator – easy access to all your items due to shelving and drawers being a big draw – it also has all the difficulties when it comes to moving.
To transport an upright freezer:
- Empty and unplug the appliance. Allow the freezer to defrost, if necessary.
- Remove any shelves or drawers. While it may be a tedious extra step, this is especially important if you’ll be laying the freezer on its side. Once it’s rotated, any pieces that are resting on their supports rather than clicked in will fall out and be damaged or cause damage.
- Protect your floor by laying down a mat, spare flooring, or furniture slider pads.
- Identify the compressor. This will be important while you’re moving the freezer, but now’s the time to take note. Pull the unit away from the wall enough that you can step behind it. At the bottom of the freezer, you’ll see some vents – the compressor will be on the opposite side.
- Secure the doors. This can be done either by completely wrapping the appliance in moving blankets or using painter’s tape to hold them closed.
- Move the freezer. Ideally, you will be able to transport the appliance upright, but you’ll certainly need to lay it down at some point in transit. Never lay the freezer on its back. If you need to lean the freezer over, ensure that the compressor side is the one that leans downward.
- Let the freezer rest. The freezer should be allowed to stand upright unplugged for as long as it was on its side, up to 24 hours.
Once the freezer is plugged back in, it’ll take time for it to return to the proper temperature, although the exact amount of time will depend on the size of the appliance, you’re looking at 4-5 hours minimum.
Because you don’t want to risk thawing and refreezing your frozen items, don’t refill the freezer until it’s at least 10°F.
Can you transport a mini fridge on its side?
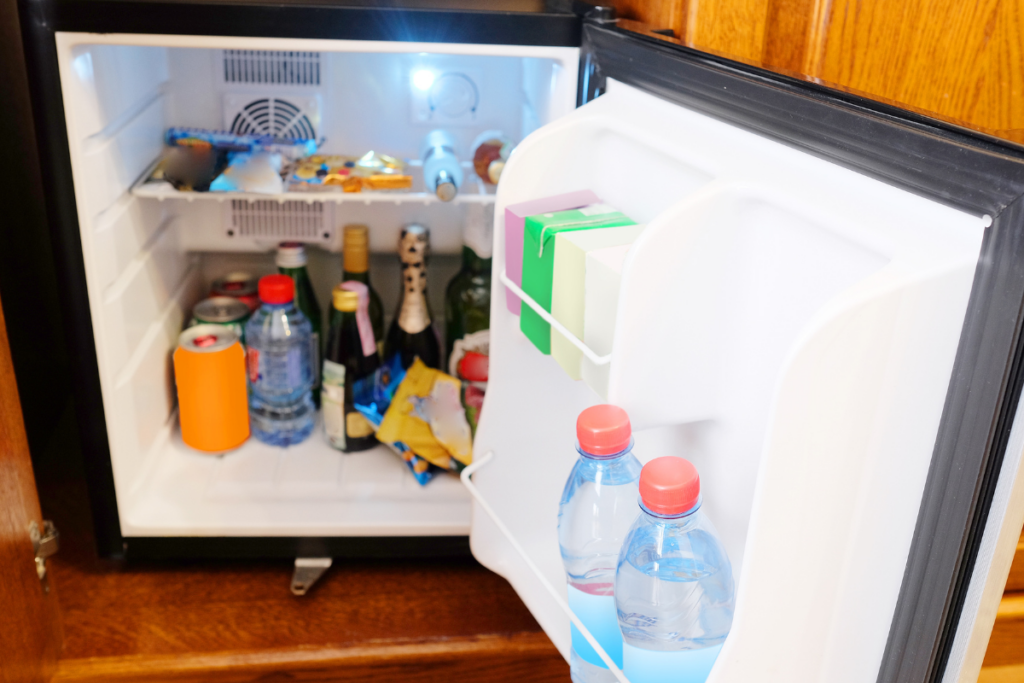
Mini fridges are a staple of offices, college dorms, and mancaves everywhere. Unlike their full-size counterparts, it’s not uncommon to find yourself lugging one of these around, but then you get to your car and find it doesn’t quite fit. Is it okay to transport a mini fridge on its side or does it need to stay upright?
Mini fridges should be kept entirely upright unless they’ve been allowed to drain for at least a day in advance. Once drained, the mini fridge can be laid compressor-side down if necessary, although manufacturers do recommend against it.
Once the mini fridge has been moved, it should be allowed to sit for at least an hour, whether it was laid down or not. If it was laid on its side, stand it up for 4 hours (or however long it was on its side, if longer than 4 hours) before plugging it back in.
How to transport a mini fridge
While you may not find yourself moving your mini fridge often, it’s probably going to come up occasionally.
To transport a mini fridge:
- Empty and unplug the appliance. Allow the freezer to defrost, if necessary. You will also need to allow at least 24 hours for it to completely drain.
- Remove any shelves or drawers. While it may be a tedious extra step, this is especially important if you’ll be laying the refrigerator on its side. Once it’s rotated, any pieces that are resting on their supports rather than clicked in will fall out and be damaged or cause damage.
- Protect your floor by laying down a mat, spare flooring, or furniture slider pads. While it may seem small, a mini fridge can still do major damage.
- Identify the compressor. This will be important while you’re moving, but now’s the time to take note. At the bottom of the back of the appliance, you’ll see some vents – the compressor will be on the opposite side.
- Secure the doors. This can be done either by completely wrapping the mini fridge in moving blankets or just using painter’s tape to hold them closed.
- Move the refrigerator. Ideally, you will be able to transport the appliance upright, but you may need to lay it down at some point. Never lay the mini fridge on its back. If you need to lean it over, ensure that the compressor side is the one that leans downward.
- Let the mini fridge rest. The refrigerator should be allowed to stand upright unplugged for as long as the refrigerator was on its side, at least 4 hours.
Once the mini fridge is plugged back in, it’ll take time for it to return to the proper temperature, although the exact amount of time will depend on the size of the appliance.
Check out this article to learn everything you need to know about transporting a mini fridge.
Summary of how to transport a freezer
Moving a freezer is never a simple task and is likely to involve a good bit of tilting and maneuvering to get it in and out, but there are certain precautions you can take to avoid damaging it in transport.
Lay the freezer compressor side down. The compressor is responsible for superheating the refrigerant and kickstarting the cooling process. If the compressor is without refrigerant to transfer the heat, you risk overheating and damage to this critical part of your freezer.
Keep the freezer upright as much as possible. This may mean saving the freezer for last when you’re loading the truck, or ensuring that it’s put in place as soon as you arrive. Limiting the amount of time your freezer is on its side will reduce the likelihood of damage when you restart it.
Let the freezer sit upright for as long as it was on its side. This should allow any refrigerant that has settled in the system to redistribute properly. Only after its rested should you plug the appliance in.
Let Us Know How We’re Doing!
Did this expertly prepared resource answer your question?
Do you have another question about home maintenance, home improvement projects, home appliance repair, or something else?
Get more information, send in questions and keep the discussion going by contacting the I’ll Just Fix It Myself company customer service team at at 1-800-928-1490 or Email us at [email protected]